Deployment Guide - Install On-Premises
This guide walks you through installing Intel® AI for Enterprise Solutions on-premises, step by step, from bare metal to a running self-hosted AI stack. No Kubernetes experience needed.
What Gets Installed
The installer sets up these layers automatically, in dependency order:
1. Infrastructure                — Kubernetes (via Kubespray), storage (local-path / NFS / Ceph)
2. Platform                      — cert-manager, Istio, MetalLB, Envoy Gateway, PostgreSQL, Keycloak, MinIO, Observability
3. Inference                     — NRI CPU Balloons + components from the ext inference repo (KServe, LiteLLM, vLLM, etc.)
4. Intel AI for Enterprise RAG   — opt-in RAG layer (vector DB, ingestion, chat, UI) — requires init erag + install erag
You run one command and everything is installed.
Before You Start
Your machine needs:
- Ubuntu 22.04 (or newer) or RHEL/Rocky 8+
- Internet access (proxy is fine — see Step 2)
- Python 3.11+ (installer will check and install if needed)
Tooling installed by configure. ./es_auto_installer.sh configure
installs these pinned versions into /usr/local/bin (and skips any that are
already present). You can install them manually instead:
| Tool | Version | Notes |
|---|---|---|
| Python | ≥ 3.11 | plus the matching python<ver>-venv package |
| yq | v4.53.2 | mikefarah/yq |
| kubectl | v1.34.3 | |
| helm | v3.20.2 | |
| git | any | required to clone the external repos |
Multi-node / remote setups: configure an NTP server (or
chrony/systemd-timesyncd) on every node before installing. Kubernetes, etcd, TLS certificates, and token auth all depend on synchronized clocks — clock skew between nodes surfaces as intermittent, hard-to-diagnose cert and etcd errors. Not required for a single localhost node.
Minimum hardware requirements:
| Deployment | RAM | Disk |
|---|---|---|
| Platform + Observability only (no models) | 32 GB | 200 GB |
| Inference with 3B model | 64 GB | 300 GB |
| Inference with 8B model | 128 GB | 400 GB |
More CPU cores = faster model inference. Intel Xeon recommended for CPU-based vLLM workloads.
Step 1: Get the Code and Configure
git clone https://github.com/intel/enterprise-ai-solutions.git
cd enterprise-ai-solutions

# Configure your machine (installs Python 3.11+, yq, kubectl, helm, sets up venv)
./es_auto_installer.sh configure

# Create a new environment named "local" for inference
./es_auto_installer.sh init inference
This creates an environment at env/local/ with:
global_config.yaml— your settingsinventory/hosts.yaml— where your machines arekubeconfig.yaml— cluster credentials (generated during install)logs/— installer logs
Step 2: Edit Your Settings
Open your environment's config:
nano env/local/global_config.yamlIf you're behind a corporate proxy, scroll to the bottom and update:
http_proxy: "http://your-proxy:8080"
https_proxy: "http://your-proxy:8080"
no_proxy: "localhost,127.0.0.1,.svc,.cluster.local,.monitoring"
If you have your own TLS certificates and domain, find the TLS section and update:
gateway_tls_mode: "custom"
base_domain_name: "your-domain.com"
gateway_tls_cert_file: "/path/to/your/cert.pem"
gateway_tls_key_file: "/path/to/your/key.pem"
Otherwise, leave the defaults — a self-signed certificate is generated automatically.
Everything else can stay as-is for now. Save and close the file.
Step 3: Choose Your Deployment Mode
The installer reads machine details from env/local/inventory/hosts.yaml. Pick one of the three options below based on how many machines you have.
Option A: Single Machine (Simplest)
Best for: Getting started, dev/test, single Intel® Xeon® servers.
Everything runs on one machine. No SSH setup needed.
Nothing to configure — the default inventory created by init already does this (localhost deployment).
Install:
./es_auto_installer.sh install inference --env localWait 15–20 minutes. When it finishes, check:
export KUBECONFIG=$(pwd)/env/local/kubeconfig.yaml
kubectl get nodes
You should see:
NAME      STATUS   ROLES           AGE   VERSION
master1   Ready    control-plane   10m   v1.34.3
Done. Skip to Step 4.
Option B: Multiple Machines
Best for: Production deployments with separate master and worker machines.
What you need:
- 2 or more machines that can reach each other over the network
- You'll run the installer from one of them (usually the first master)
B.1 — Set up SSH access
Pick one machine to run the installer from. On that machine, run:
# Create an SSH key (press Enter for all prompts)
ssh-keygen -t ed25519 -f ~/.ssh/cluster_key -N ""

# Copy it to every other machine (replace IPs with yours)
ssh-copy-id -i ~/.ssh/cluster_key ubuntu@10.0.1.10
ssh-copy-id -i ~/.ssh/cluster_key ubuntu@10.0.1.20
ssh-copy-id -i ~/.ssh/cluster_key ubuntu@10.0.1.21

# Test — each should print the hostname
ssh -i ~/.ssh/cluster_key ubuntu@10.0.1.10 "hostname"
ssh -i ~/.ssh/cluster_key ubuntu@10.0.1.20 "hostname"
ssh -i ~/.ssh/cluster_key ubuntu@10.0.1.21 "hostname"
On every target machine, make sure the user can run commands as root without a password:
echo "ubuntu ALL=(ALL) NOPASSWD:ALL" | sudo tee /etc/sudoers.d/ubuntuB.2 — Edit your inventory
Open env/local/inventory/hosts.yaml. The template has three examples pre-commented. Uncomment and customize the multi-node section:
all:
  hosts:
    master1:
      ansible_host: 10.0.1.10
      ip: 10.0.1.10
      access_ip: 10.0.1.10
    worker1:
      ansible_host: 10.0.1.20
      ip: 10.0.1.20
      access_ip: 10.0.1.20
    worker2:
      ansible_host: 10.0.1.21
      ip: 10.0.1.21
      access_ip: 10.0.1.21
  children:
    kube_control_plane:
      hosts:
        master1:
    kube_node:
      hosts:
        master1:
        worker1:
        worker2:
    etcd:
      hosts:
        master1:
    k8s_cluster:
      children:
        kube_control_plane:
        kube_node:
  vars:
    ansible_user: ubuntu
    ansible_ssh_private_key_file: ~/.ssh/cluster_key
What do the groups mean?
| Group | What it does | How many do I need? |
|---|---|---|
kube_control_plane | Manages the cluster | At least 1. Use 3 for high-availability. |
etcd | Stores cluster data | Same as control_plane hosts (or separate). |
kube_node | Runs your actual workloads | At least 1. Add more for capacity. |
Example: just 2 machines (smallest multi-node)
all:
  hosts:
    master1:
      ansible_host: 10.0.1.10
      ip: 10.0.1.10
    worker1:
      ansible_host: 10.0.1.20
      ip: 10.0.1.20
  children:
    kube_control_plane:
      hosts:
        master1:
    kube_node:
      hosts:
        master1:    # master also runs workloads
        worker1:
    etcd:
      hosts:
        master1:
    k8s_cluster:
      children:
        kube_control_plane:
        kube_node:
  vars:
    ansible_user: ubuntu
    ansible_ssh_private_key_file: ~/.ssh/cluster_key
Example: 3 masters + 3 workers (production HA)
all:
  hosts:
    master1:
      ansible_host: 10.0.1.10
      ip: 10.0.1.10
    master2:
      ansible_host: 10.0.1.11
      ip: 10.0.1.11
    master3:
      ansible_host: 10.0.1.12
      ip: 10.0.1.12
    worker1:
      ansible_host: 10.0.1.20
      ip: 10.0.1.20
    worker2:
      ansible_host: 10.0.1.21
      ip: 10.0.1.21
    worker3:
      ansible_host: 10.0.1.22
      ip: 10.0.1.22
  children:
    kube_control_plane:
      hosts:
        master1:
        master2:
        master3:
    kube_node:
      hosts:
        worker1:
        worker2:
        worker3:
    etcd:
      hosts:
        master1:
        master2:
        master3:
    k8s_cluster:
      children:
        kube_control_plane:
        kube_node:
  vars:
    ansible_user: ubuntu
    ansible_ssh_private_key_file: ~/.ssh/cluster_key
B.3 — Install
./es_auto_installer.sh install inference --env localWait 15–25 minutes. When done:
export KUBECONFIG=$(pwd)/env/local/kubeconfig.yaml
kubectl get nodes
You should see all your machines listed as Ready.
Done. Skip to Step 4.
Option C: Bastion (Jump Host)
Best for: When your cluster machines are in a private network and you can only reach them through a gateway machine.
This is the same as Option B, except you run the installer on the bastion (gateway) machine — which does NOT become part of the cluster.
 You → SSH → [Bastion] → SSH → [master1, worker1, worker2, ...]
              (runs installer)    (become the cluster)
C.1 — On the bastion: get the code and set up SSH
# Get the code
git clone https://github.com/intel/enterprise-ai-solutions.git
cd enterprise-ai-solutions

# Configure machine and create environment
./es_auto_installer.sh configure
./es_auto_installer.sh init inference

# Create SSH key and copy to all cluster machines
ssh-keygen -t ed25519 -f ~/.ssh/cluster_key -N ""
ssh-copy-id -i ~/.ssh/cluster_key ubuntu@10.0.1.10
ssh-copy-id -i ~/.ssh/cluster_key ubuntu@10.0.1.20
ssh-copy-id -i ~/.ssh/cluster_key ubuntu@10.0.1.21
C.2 — Configure
Edit env/local/inventory/hosts.yaml — same structure as Option B. For example:
all:
  hosts:
    master1:
      ansible_host: 10.0.1.10
      ip: 10.0.1.10
    worker1:
      ansible_host: 10.0.1.20
      ip: 10.0.1.20
    worker2:
      ansible_host: 10.0.1.21
      ip: 10.0.1.21
  children:
    kube_control_plane:
      hosts:
        master1:
    kube_node:
      hosts:
        master1:
        worker1:
        worker2:
    etcd:
      hosts:
        master1:
    k8s_cluster:
      children:
        kube_control_plane:
        kube_node:
  vars:
    ansible_user: ubuntu
    ansible_ssh_private_key_file: ~/.ssh/cluster_key
If there's another jump host between your bastion and the nodes, add to the vars section:
  vars:
    ansible_user: ubuntu
    ansible_ssh_private_key_file: ~/.ssh/cluster_key
    ansible_ssh_common_args: '-o ProxyJump=jumpuser@10.0.0.5'
Most of the time you won't need this — only if there's a double-hop.
C.3 — Install
./es_auto_installer.sh install inference --env localC.4 — Get kubectl working on the bastion
After install, the kubeconfig is already created at env/local/kubeconfig.yaml:
export KUBECONFIG=$(pwd)/env/local/kubeconfig.yaml
kubectl get nodes
Done. Continue to Step 4.
Step 4: Verify Everything Works
Set the kubeconfig and check the cluster:
export KUBECONFIG=$(pwd)/env/local/kubeconfig.yaml

# All nodes should say "Ready"
kubectl get nodes

# All pods should say "Running"
kubectl get pods -A
Or use the built-in validate command:
./es_auto_installer.sh validate inference --env localScaling: Adding More Machines Later
Already have a running cluster and want to add workers? Easy.
Set up SSH to the new machine (same as before):
bashssh-copy-id -i ~/.ssh/cluster_key ubuntu@10.0.1.22Add the new machine to
env/local/inventory/hosts.yaml:yamlall: hosts: master1: ansible_host: 10.0.1.10 ip: 10.0.1.10 worker1: ansible_host: 10.0.1.20 ip: 10.0.1.20 worker2: # ← add this ansible_host: 10.0.1.22 ip: 10.0.1.22 children: kube_control_plane: hosts: master1: kube_node: hosts: master1: worker1: worker2: # ← and add here etcd: hosts: master1: k8s_cluster: children: kube_control_plane: kube_node: vars: ansible_user: ubuntu ansible_ssh_private_key_file: ~/.ssh/cluster_keyRe-run the installer — it detects new nodes and adds them:
bash./es_auto_installer.sh install inference --env local
The installer is idempotent. Existing nodes are untouched; only new machines are provisioned.
Teardown: Removing Everything
# Remove the full stack (infrastructure + platform + inference)
./es_auto_installer.sh teardown infrastructure --env local

# Remove just one component
./es_auto_installer.sh teardown llm_services --env local
./es_auto_installer.sh teardown kserve --env local
Troubleshooting
"Connection refused" or SSH errors
Test SSH manually first:
ssh -i ~/.ssh/cluster_key ubuntu@10.0.1.10 "hostname"If this doesn't work, the installer won't work either. Fix SSH access first.
Install fails partway through
Check the log:
tail -50 env/local/logs/install.logThen just re-run — the installer is safe to run multiple times:
./es_auto_installer.sh install inference --env localPods stuck in "ImagePullBackOff"
This usually means the proxy settings are wrong. Double-check http_proxy and https_proxy in env/local/global_config.yaml.
Skip dependency auto-inclusion (expert mode)
If you want to install only a specific component without pulling its entire layer dependency chain:
./es_auto_installer.sh install metallb --env local --onlyThis runs only the named target without traversing the dependency tree.
Pass Ansible flags for more details
./es_auto_installer.sh install inference --env local -- -vvvThe -- separates installer flags from Ansible flags.
Common Issues
Wrong kubeconfig
Make sure you're using the right one:
export KUBECONFIG=$(pwd)/env/local/kubeconfig.yaml
kubectl get nodes
Multiple environments getting mixed up
Each environment is isolated. Always specify --env <name> and use the correct kubeconfig:
# For environment "prod"
export KUBECONFIG=$(pwd)/env/prod/kubeconfig.yaml
./es_auto_installer.sh install inference --env prod
Logs
All logs are stored per-environment under env/<name>/logs/, named with action, target, and timestamp:
env/<name>/logs/install-all-20260817-143022.log
env/<name>/logs/teardown-all-20260817-150100.log
env/<name>/logs/validate-all-20260817-151500.log
Quick Reference
# Environment setup
./es_auto_installer.sh configure                          # one-time machine prep
./es_auto_installer.sh init <layer> --env <name>          # create new environment (layer: inference or erag)
./es_auto_installer.sh show                               # list layers/components

# Installation
./es_auto_installer.sh install inference --env <name>           # install infrastructure + platform + inference
./es_auto_installer.sh install kubernetes --env <name>          # install just Kubernetes
./es_auto_installer.sh install metallb --env <name> --only      # single component, skip deps
./es_auto_installer.sh install inference --env <name> -- -vvv   # pass Ansible flags

# Operations
./es_auto_installer.sh validate inference --env <name>  # check health
./es_auto_installer.sh teardown infrastructure --env <name>  # remove everything

# Kubeconfig
export KUBECONFIG=$(pwd)/env/<name>/kubeconfig.yaml
kubectl get nodes
Deploying and Accessing Models
Once the platform is installed, deploy models and access them via the AI gateway. The access pattern depends on which auth provider you configured.
Auth Modes at a Glance
Keycloak (auth_provider: keycloak) | LiteLLM (auth_provider: litellm) | |
|---|---|---|
| What's deployed | Keycloak OIDC + Envoy AI Gateway | LiteLLM proxy + Langfuse + Valkey (no Keycloak) |
| Auth mechanism | JWT via client credentials flow | Virtual API keys (or master key) |
| Request path | Client → Envoy AI Gateway (validates JWT) → vLLM pod | Client → Envoy Gateway (extAuth → LiteLLM /key/verify) → LiteLLM → KServe |
| Model endpoint | https://inference.<domain>/v1/chat/completions | https://litellm.<domain>/v1/chat/completions |
| Model selection | Via "model" field in request body (AI Gateway routes) | Via "model" field in request body (LiteLLM routes) |
| Best for | Production SSO, per-user RBAC, audit trail | Multi-tenant, per-key budgets, simpler setup |
1. Common Setup
Set your kubeconfig and get the gateway IP (replace <env> with your environment name, e.g. prod):
export KUBECONFIG=$(pwd)/env/<env>/kubeconfig.yaml

GATEWAY_IP=$(kubectl get svc -n envoy-gateway-system \
  -l gateway.envoyproxy.io/owning-gateway-name \
  --field-selector spec.type=LoadBalancer \
  -o jsonpath='{.items[0].status.loadBalancer.ingress[0].ip}')

DOMAIN=$(yq '.base_domain_name' env/<env>/global_config.yaml)
TLS certificate: When using self-signed TLS (the default), the installer exports a CA certificate to:
env/<name>/logs/ai-solutions-ca.crtImport this into your browser or OS trust store to access web UIs (Keycloak, Grafana, Langfuse) without certificate warnings. For programmatic access, use --cacert env/local/logs/ai-solutions-ca.crt with curl instead of -k, or set SSL_CERT_FILE for Python/SDK clients.
2. Deploy a Model
Deploy a model — this works the same regardless of auth mode:
# Deploy from the model catalog (downloads weights + creates serving pod)
./model-manager deploy qwen3-0-6b --wait

# Gated models (Llama, Mistral, …) need a Hugging Face token:
export HF_TOKEN="hf_your_token_here"
./model-manager deploy llama3-8b-awq --wait

# Verify
kubectl get pods -n llm-inference
kubectl get llminferenceservices -n llm-inference
The --wait flag blocks until the model is ready to serve requests (typically 2–5 minutes depending on model size and download speed).
3. Authenticate and Access
Choose the section matching your auth_provider.
Option A — Keycloak JWT (auth_provider: "keycloak", default)
When auth_provider=keycloak (the default), the platform deploys Keycloak for full OIDC identity management. Models are accessed through the Envoy AI Gateway at a single inference endpoint. Authentication uses the client credentials flow (no user passwords needed).
Quick method — use the helper script:
source ./ext/enterprise.ai-inference/model_manager/scripts/get-keycloak-token.sh
# Exports: TOKEN, GATEWAY_IP, GATEWAY_DOMAIN
# Auto-discovers gateway IP, Keycloak domain, and client credentials from the cluster
The token is valid for 15 minutes. For longer sessions, pass --lifespan 3600 (1 hour).
Manual method — step by step:
# 1. Get the gateway IP
GATEWAY_IP=$(kubectl get svc -n envoy-gateway-system \
  -l gateway.envoyproxy.io/owning-gateway-name \
  --field-selector spec.type=LoadBalancer \
  -o jsonpath='{.items[0].status.loadBalancer.ingress[0].ip}')

# 2. Get the Keycloak domain
KEYCLOAK_DOMAIN=$(kubectl get keycloaks -n keycloak \
  -o jsonpath='{.items[0].spec.hostname.hostname}')

# 3. Read client credentials
CLIENT_ID=$(kubectl get secret keycloak-client-secret -n keycloak \
  -o jsonpath='{.data.client-id}' | base64 -d)
CLIENT_SECRET=$(kubectl get secret keycloak-client-secret -n keycloak \
  -o jsonpath='{.data.client-secret}' | base64 -d)

# 4. Request a JWT token
TOKEN=$(curl -sk --noproxy '*' \
  --resolve "${KEYCLOAK_DOMAIN}:443:${GATEWAY_IP}" \
  "https://${KEYCLOAK_DOMAIN}/realms/inference/protocol/openid-connect/token" \
  -d "grant_type=client_credentials" \
  -d "client_id=${CLIENT_ID}" \
  -d "client_secret=${CLIENT_SECRET}" \
  | python3 -c "import sys,json; print(json.load(sys.stdin)['access_token'])")

echo "Token: ${TOKEN:0:20}..."
Call the model:
GATEWAY_DOMAIN="inference.$(yq '.base_domain_name' env/<env>/global_config.yaml)"

curl -sk --noproxy '*' \
  --resolve "${GATEWAY_DOMAIN}:443:${GATEWAY_IP}" \
  "https://${GATEWAY_DOMAIN}/v1/chat/completions" \
  -H "Authorization: Bearer ${TOKEN}" \
  -H "Content-Type: application/json" \
  -d '{"model":"qwen3-0-6b","messages":[{"role":"user","content":"Hello!"}],"max_tokens":64}'
List available models:
curl -sk --noproxy '*' \
  --resolve "${GATEWAY_DOMAIN}:443:${GATEWAY_IP}" \
  "https://${GATEWAY_DOMAIN}/v1/models" \
  -H "Authorization: Bearer ${TOKEN}"
A request with a missing, malformed, or expired JWT is rejected with 401 at the gateway before it reaches a model.
Option B — LiteLLM virtual keys (auth_provider: "litellm")
When auth_provider=litellm, Keycloak is not deployed. LiteLLM acts as both the auth layer and model proxy. All models are auto-registered with LiteLLM at deploy time — you access them through a single endpoint and specify the model name in the request body.
1. Get the master key:
MASTER_KEY=$(kubectl get secret litellm-master-key -n litellm \
  -o jsonpath='{.data.master_key}' | base64 -d)

LITELLM_DOMAIN="litellm.$(yq '.base_domain_name' env/<env>/global_config.yaml)"
2. Get a token — use the master key directly, or mint a scoped virtual key (recommended for applications):
# Create a virtual key with a model allow-list, budget cap, and expiry
VIRTUAL_KEY=$(curl -sk --noproxy '*' \
  --resolve "${LITELLM_DOMAIN}:443:${GATEWAY_IP}" \
  "https://${LITELLM_DOMAIN}/key/generate" \
  -H "Authorization: Bearer ${MASTER_KEY}" \
  -H "Content-Type: application/json" \
  -d '{"models":["qwen3-0-6b"],"key_alias":"team-a","max_budget":5,"duration":"24h"}' \
  | jq -r '.key')

TOKEN="${VIRTUAL_KEY}"   # or TOKEN="${MASTER_KEY}" to skip key creation
3. Call the model:
curl -sk --noproxy '*' \
  --resolve "${LITELLM_DOMAIN}:443:${GATEWAY_IP}" \
  "https://${LITELLM_DOMAIN}/v1/chat/completions" \
  -H "Authorization: Bearer ${TOKEN}" \
  -H "Content-Type: application/json" \
  -d '{"model":"qwen3-0-6b","messages":[{"role":"user","content":"Hello!"}],"max_tokens":64}'
A missing or revoked key is rejected with 401 before anything reaches the model. A key used outside its model allow-list is also rejected.
4. Manage keys:
# List (alias, allow-list, budget, spend to date)
curl -sk --noproxy '*' \
  --resolve "${LITELLM_DOMAIN}:443:${GATEWAY_IP}" \
  "https://${LITELLM_DOMAIN}/key/list?return_full_object=true" \
  -H "Authorization: Bearer ${MASTER_KEY}"

# Update (e.g. extend budget)
curl -sk --noproxy '*' \
  --resolve "${LITELLM_DOMAIN}:443:${GATEWAY_IP}" \
  "https://${LITELLM_DOMAIN}/key/update" \
  -H "Authorization: Bearer ${MASTER_KEY}" \
  -H "Content-Type: application/json" \
  -d '{"key":"sk-...","max_budget":20}'

# Revoke
curl -sk --noproxy '*' \
  --resolve "${LITELLM_DOMAIN}:443:${GATEWAY_IP}" \
  "https://${LITELLM_DOMAIN}/key/delete" \
  -H "Authorization: Bearer ${MASTER_KEY}" \
  -H "Content-Type: application/json" \
  -d '{"keys":["sk-..."]}'
Keys can also be managed in the LiteLLM UI at https://${LITELLM_DOMAIN}/ui/ (trailing slash required — bare /ui 307-redirects to http://). Log in with username admin and the master key as the password. Request traces land in Langfuse at https://langfuse.<domain>.
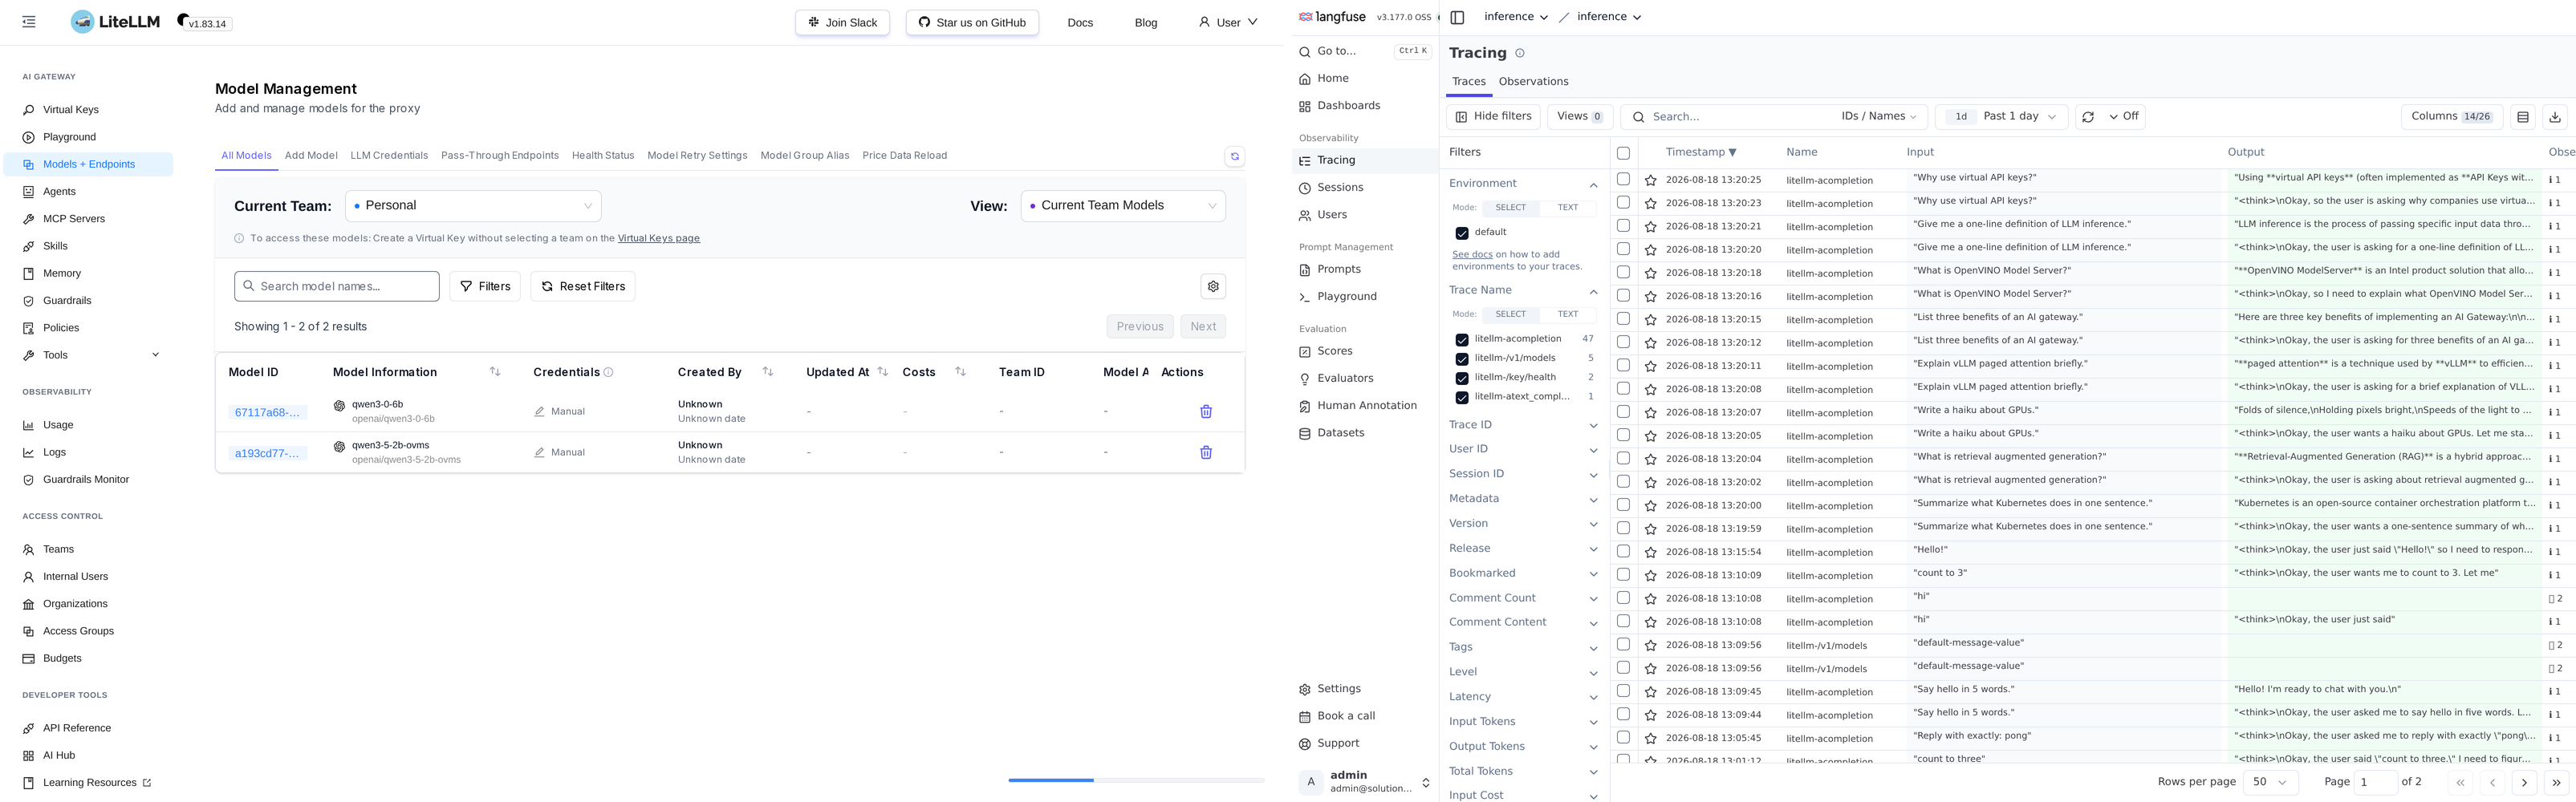
More views of both UIs are in docs/assets/screenshots/ —
litellm-models.png, litellm-virtual-keys.png, litellm-usage.png,
litellm-logs.png, langfuse-dashboard.png, and langfuse-traces.png.
4. Access the Model — curl
With auth_provider: "keycloak" (default)
All models are served through a single inference gateway endpoint. Select the model via the "model" field in the request body:
# If you used the helper script, GATEWAY_IP and GATEWAY_DOMAIN are already set.
# Otherwise, derive the inference domain:
GATEWAY_DOMAIN="inference.$(yq '.base_domain_name' env/<env>/global_config.yaml)"

curl -sk --noproxy '*' \
  --resolve "${GATEWAY_DOMAIN}:443:${GATEWAY_IP}" \
  "https://${GATEWAY_DOMAIN}/v1/chat/completions" \
  -H "Authorization: Bearer ${TOKEN}" \
  -H "Content-Type: application/json" \
  -d '{
    "model": "qwen3-0-6b",
    "messages": [
      {"role": "user", "content": "What is Kubernetes in one sentence?"}
    ],
    "max_tokens": 100
  }'
List available models:
curl -sk --noproxy '*' \
  --resolve "${GATEWAY_DOMAIN}:443:${GATEWAY_IP}" \
  "https://${GATEWAY_DOMAIN}/v1/models" \
  -H "Authorization: Bearer ${TOKEN}"
Or use the built-in helper to get token + gateway details in one step:
source ./ext/enterprise.ai-inference/model_manager/scripts/get-keycloak-token.sh
# Exports: TOKEN, GATEWAY_IP, GATEWAY_DOMAIN
With auth_provider: "litellm"
Single endpoint, model selected via request body:
LITELLM_DOMAIN="litellm.$(yq '.base_domain_name' env/<env>/global_config.yaml)"

curl -sk --noproxy '*' \
  --resolve "${LITELLM_DOMAIN}:443:${GATEWAY_IP}" \
  "https://${LITELLM_DOMAIN}/v1/chat/completions" \
  -H "Authorization: Bearer ${TOKEN}" \
  -H "Content-Type: application/json" \
  -d '{
    "model": "qwen3-0-6b",
    "messages": [
      {"role": "user", "content": "What is Kubernetes in one sentence?"}
    ],
    "max_tokens": 100
  }'
Add "stream": true to the request body for server-sent events. A missing or invalid
key is rejected with 401 by LiteLLM before anything reaches the model.
List models registered in LiteLLM — every model registered by model-manager deploy
appears here:
curl -sk --noproxy '*' \
  --resolve "${LITELLM_DOMAIN}:443:${GATEWAY_IP}" \
  "https://${LITELLM_DOMAIN}/v1/models" \
  -H "Authorization: Bearer ${TOKEN}"
5. Access the Model — Python (OpenAI Client)
With auth_provider: "keycloak" (default)
import os
import httpx
from openai import OpenAI

# GATEWAY_DOMAIN and TOKEN are set by the helper script
# source ./ext/enterprise.ai-inference/model_manager/scripts/get-keycloak-token.sh
client = OpenAI(
    base_url=f"https://{os.environ['GATEWAY_DOMAIN']}/v1",
    api_key=os.environ["TOKEN"],
    http_client=httpx.Client(verify=False),  # for self-signed certs
)

response = client.chat.completions.create(
    model="qwen3-0-6b",
    messages=[{"role": "user", "content": "What is Kubernetes in one sentence?"}],
    max_tokens=100,
)
print(response.choices[0].message.content)

# List models
for model in client.models.list():
    print(model.id)
With auth_provider: "litellm"
import os
import httpx
from openai import OpenAI

# TOKEN = master key or virtual key
client = OpenAI(
    base_url=f"https://{os.environ['LITELLM_DOMAIN']}/v1",
    api_key=os.environ["TOKEN"],
    http_client=httpx.Client(verify=False),  # for self-signed certs
)

response = client.chat.completions.create(
    model="qwen3-0-6b",
    messages=[{"role": "user", "content": "What is Kubernetes in one sentence?"}],
    max_tokens=100,
)
print(response.choices[0].message.content)
Token Refresh
| Auth Mode | Token Lifetime | Refresh |
|---|---|---|
litellm | Configurable per key (default: no expiry, or set duration at creation) | Create a new virtual key |
keycloak | 15 minutes (configurable via --lifespan) | Re-run the helper script |
Keycloak — re-source the helper to get a fresh token:
source ./ext/enterprise.ai-inference/model_manager/scripts/get-keycloak-token.shFor longer sessions (e.g. 1 hour):
source ./ext/enterprise.ai-inference/model_manager/scripts/get-keycloak-token.sh --lifespan 3600Deploying Intel® AI for Enterprise RAG
Intel AI for Enterprise RAG adds document ingestion, vector search, RAG pipelines, and a web UI on top of the inference layer. It is opt-in and requires a separate initialization and installation.
Quick path:
./es_auto_installer.sh init erag --env <name>
./es_auto_installer.sh install erag --env <name>
The init erag command clones the inference and Intel AI for Enterprise RAG repositories (dependencies first), seeds env/<name>/config.erag.yaml from the selected pipeline flavour (default: chatqna), and records the provisioned layer in env/<name>/.solutions.yaml. The install erag command automatically pulls all dependencies (infrastructure → platform → inference) if not already deployed, then installs the RAG application layer.
See the full guide: Getting Started with RAG covers prerequisites, flavour selection, per-layer install and teardown, configuration, and troubleshooting.
Related Docs
| If you want to… | Go to |
|---|---|
| Deploy across multiple machines or onto a cluster you already run | Multi-Node & BYO Cluster |
| Change TLS, storage, auth provider, or any other setting used above | Configuration Reference |
| Deploy your first model once the platform is up | Deploy an LLM |
| Understand exactly how a request reaches a model after install | Network Architecture |